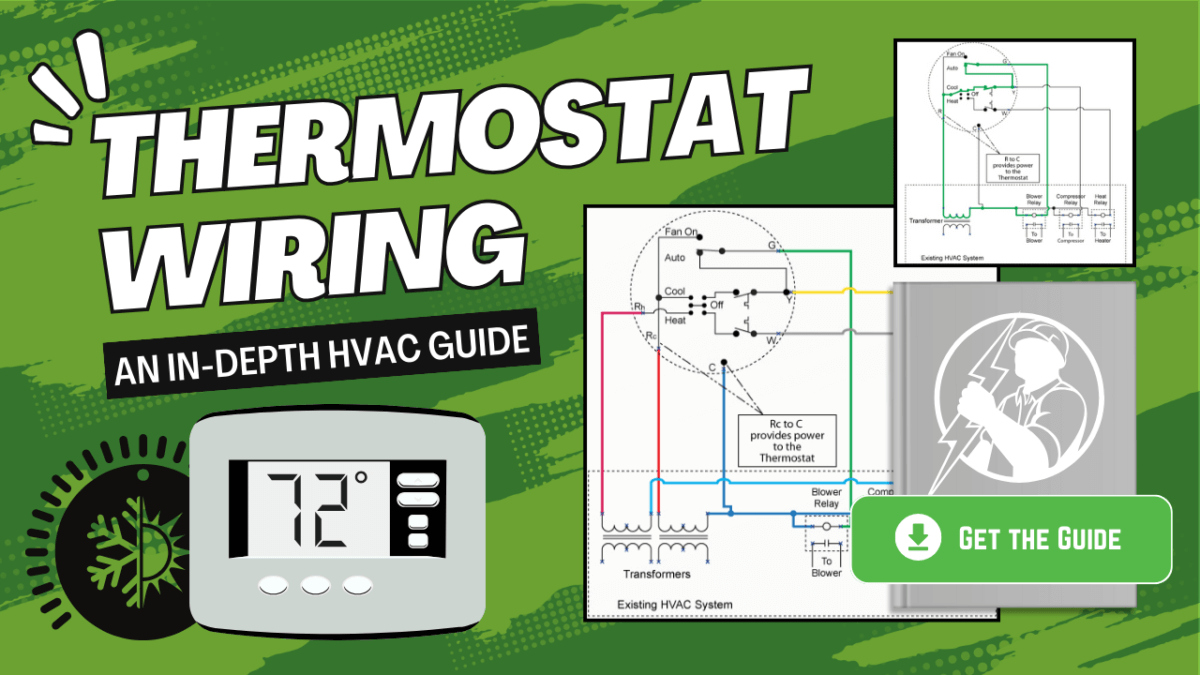
Download a PDF version of the Thermostat Wiring article: Thermostatic Wiring and Principles
Basic Thermostat Types
Many technicians have great difficulty understanding how to properly wire a thermostat or how to replace a thermostat with a different thermostat. In fact, the wiring of a thermostat is quite simple circuitry, the confusion arises principally because of the various different ways different equipment manufacturers handle the heating mode of the systems and the different ways a cooling system can be interfaced with the assorted types of heating systems, ranging from furnaces, heat pumps, and electric heat or combinations of many of these heating systems operating in sequence.
The first step is to understand the basic wiring for a simple cooling circuit of an air conditioner. Then we can add in the various methods of activating the different heating systems.
Just like a light switch circuit, to activate a relay, power is supplied from a power source to a load. In the case of HVAC/R systems, the power source is a low-voltage transformer (usually a 24 VAC transformer) and the two wires supplying the power are labeled C (common) and R.
The common or C wire does not need to be run out to the thermostat, however if the thermostat requires power, the C wire should be routed to the thermostat. Even if the current thermostat being used does not require external power it is an excellent idea to bring the C wire out to the thermostat in anticipation of a future installation of a thermostat that requires power. For systems that do not have access to the C wire, a battery in the thermostat compartment must be used. This is a poor substitute for a line source of power, since the thermostat will cease to function when the battery dies.
HVAC/R labeling conventions of other thermostat wires:
The G wire completes the circuit from the R-leg of the power supply, back to the blower contactor coil. The coil then gets the 24 VAC from the common and G wires
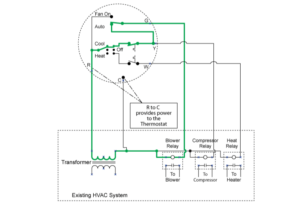
Individual circuit for blower relay coil – Auto
The Y wire completes the circuit from the R-leg of the power supply back to the Compressor/Condenser fan contactor coil.

Individual circuit for the compressor relay coil
The W wire, if used, completes the circuit from the R-leg of the power supply back to the heater contactor coil. Sometimes there is a W1, W2, etcetera, for several stages of heating.
Individual circuit for heat relay coil
The O terminal, if used when the heat pump thermostat mode selector switch is set to COOL, completes the circuit from the R-leg of the power supply back to the O wire. It is typically used to bring power to the reversing valve and is used for a heat pump with a reversing valve where the normal (unpowered) position is for heating. If you’re using the O terminal you will NOT use the B terminal.
Type H reversing valve (notice O is a circuit while B is not wired)
The B wire, if used, is closed when the heat pump thermostat mode selector switch is set to heat. It is typically used to bring power back to the reversing valve and is used for a heat pump with a reversing valve where the normal (unpowered) position is for cooling. If you’re using the B terminal you will NOT use the O terminal.
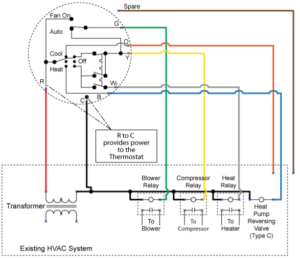
Type C reversing valve (notice B is a circuit while O is not wired)
The low-voltage 24 VAC transformer is typically located on the air condition system air handler. This transformer might also be located in the condensing unit, or anywhere else for that matter. Locating that transformer and identifying the C (common) and R wires is likely the first thing you need to do before you begin wiring your thermostat. Sometimes there are two low-voltage transformers, one for the heating system and one for the cooling systems and the outputs of each transformer should not be connected. Having two transformers is very common if the heating system is a furnace while the cooling system is an A/C. When there is a transformer in the cooling system and a second transformer on the heating system then the R wires from each transformer must be kept separated and so they are labeled as Rc (for the R wire from cooling transformer) and Rh (for the R wire from heating transformer). As we mentioned above, whenever there is an R wire there will be a C wire. So if you have two R wires you will also have two C wires. Once again, even if the thermostat you’re working with runs on a battery, it’s still wise to have the C wire run out to the thermostat in case the equipment owner changes the thermostat out, however only a single common or C wire needs to be run to the thermostat, and it is usually the Cc wire, that is the common wire from the cooling transformer.
The Rh and Ch should only be used to power relays or other components of the heating system, and the thermostat will typically only connect Rh to W (when the thermostat is calling for heating). Likewise, Rc is connected to G, Y, O, B when appropriate.
If there is only one transformer, then wires labeled Rh and Rc are the same and are typically connected or jumpered together in the thermostat. Other times there is another transformer at a heating source so Rh and Rc will be different. One should be connected to the heating unit’s transformer (Rh) and the other should be connected to the cooling unit’s transformer (Rc). A visual representation of a two-transformer circuit is below.
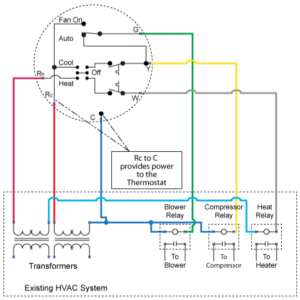
A two-transformer basic thermostat circuit
Some thermostats come pre-wired with Rh and Rc jumpered together and this jumper must be cut to create an individual Rh and Rc circuits for a two-transformer thermostat circuit.
Basic Wiring
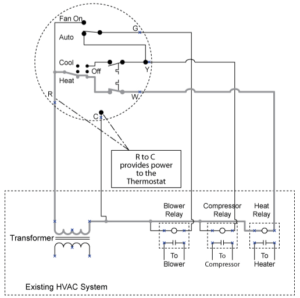
In the most basic form of control, the C or common terminal of the low voltage transformer is connected in parallel to all of the control relays. The R terminal of the low-voltage transformer is connected through the thermostat to each control relay. The thermostat controls the operation of the heater, compressor, and blower as shown in Figure 1. Figure 1 is a circuit diagram showing the simplest possible known thermostat control system for heating and cooling operation of an A/C and Furnace or A/C and electric heat system. For this system, you will notice that G (air handler blower) and Y (compressor/condenser fan) are connected. Therefore, the compressor/condenser fan and the air handler blower should always turn on at the same time. The W (heat) wire is “on its own,” so the air handler blower will NOT turn on when the heat is activated. In this case, a heater relay or some other control, such as a plenum temperature sensor, must activate the blower in heating mode. This separate control is not a part of the thermostat. The W heat wire control could also activate electric baseboard heat, where the blower is, of course, not operated.
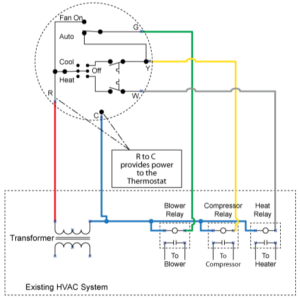
Figure 1. Basic Thermostat Circuit
The following is an explanation of how Figure 1’s thermostat actually works. You don’t need to know the following to make the thermostat work but if you learn the theory behind why the thermostat above is able to function then it will help you when you come across other more complicated thermostats. If you are new to thermostats or wiring diagrams you may need to read the following section a few times.
Referring to Figure 1, the wire designated R continues the circuit from the transformer to the thermostat. The wire designated G, when connected to R by the thermostat (look in the area where it says “cool”, “heat”, and “off”), continues the circuit from the R terminal of the transformer to the blower relay, completing the circuit and activating the blower relay and thereby operating the blower. That is when the thermostat connects R-G then the 24 volts from the transformer flows to the contactor coil via the 24 volts AC supplied to C and G.
Likewise, the wire designated Y, when connected to R by the thermostat (see right next to where it says “close on rise,” the Y wire is connected to the G wire), continues the circuit from the R terminal of the transformer to the compressor relay, completing the circuit and activating the compressor relay and usually also the condenser (outdoor) fan. This is because the outdoor fan will always operate when the compressor is operating, therefore only a single contact is necessary.
Refer to Figure 1, whenever the thermostat is set to COOL the G and Y wires are both simultaneously connected to the R wire which completes all of their circuits. So when the system is set to COOL the compressor/condenser fan (Y) and air handler blower (G) are both activated.
The wire designated Wx, (where x can be 1 or 2, it would be 1 in the above figure) when connected to R by the thermostat, continues the circuit from the R terminal of the transformer to the electric heat heater relay, completing the circuit and activating the heater. In the case of heating, there can be several heating control circuits, sometimes designated W1, W2, etc., where the thermostat may activate one or more heaters depending on the difference between the desired temperature and the actual temperature (when in the heating mode). There are many known variations of the heating configuration where one heating circuit may activate a heat pump, a second may activate a furnace and a third activates an electric heating circuit. Note that in the simple thermostat of Figure 1, when the thermostat (set to the heating position) calls for heat, the W1 circuit is activated, but the blower is not activated because the G wire is not attached to the W wire like it is to the Y wire. In "Heating" mode, when a furnace is used for heating, the blower is not typically activated by the thermostat, but rather may be controlled by a plenum temperature sensor in the vicinity of the heat source. If electric baseboard heating is used, the blower need not be activated.
Many newer replacement thermostats, allow a configuration setup where, if necessary, the G (blower) circuit can be activated when the system calls for HEAT. This type of thermostat is commonly used for A/C systems with duct-mounted electric heat and the thermostat, typically has a jumper or software setting that will allow the making of both the R-W circuit to activate the heat strip and the R-G circuit to activate the blower during heating operations.
For most heat pump and A/C systems with electric heat, typically only one transformer is used. However, as stated earlier, many furnace heating systems have a separate transformer to power the furnace heating circuit, so that a separate R circuit exists for the R to W switch, (where the Rc refers to the contact that closes Rc to G and Rc to Y during cooling, while the Rh to W1 contact is closed during heating). Once again, to provide the greatest flexibility, most thermostats have a separate circuit for Rc to G and Y and Rh to W, with a provision to jumper Rc and Rh together, to form the thermostat setup of Figure 1, namely a single R that can be connected to G, Y and W. If you have one transformer Rc and Rh will be jumped together if the cooling and heat each have separate transformers Rc and Rh need to be separate circuits.
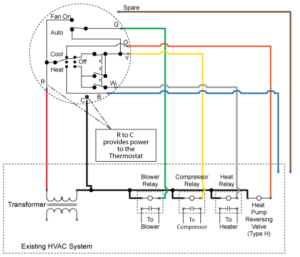
Figure 2 and 3 display a thermostat that is similar in operation to the thermostat of Figure 1, but also has a provision (R to B or R to O, only one is typically used), to activate a reversing valve, for example, in the case of a heat pump. In Figure 2, power to O when cooling is selected is used to activate the reversing valve (use when the normal unpowered state of the heat pump is heating) whereas in Figure 3 power to B when heating is selected is used to activate the reversing valve (use when normal unpowered state of the heat pump is cooling).
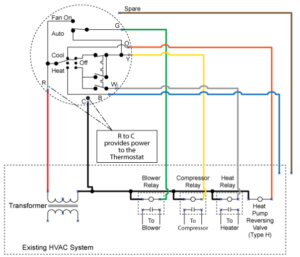
Figure 2. The thermostat is wired to activate the reversing valve to activate Cooling Mode
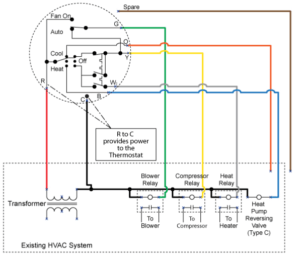
Figure 3. The thermostat is wired to activate the reversing valve to activate Heating Mode
Figure 2 and 3 display circuit diagrams of a common modern heat pump thermostat which do not use the W circuit to apply normal heat. Instead both Y and G circuits are energized when either cooling or heating is needed. In Figure 2, the R-O circuit is used to energize the reversing valve when set to "COOL.” In Figure 3, the same thermostat uses the R-B circuit to energize the reversing valve when set to "HEAT." While heat pumps use a reverse cycle to produce heating, they are almost always equipped with electric heat as a back-up emergency heat source. The R-W2 circuit in this thermostat is used to activate this emergency heating.
Finally, on most thermostats, when the fan switch is placed in the ON position it will complete the R-G circuit without regard to the position of the System Selector Switch, which can be set to "COOL", "OFF", or "HEAT".
Wiring Routing
The normal wiring of an air conditioning and heating thermostat uses a multiconductor thermostat wire. As a minimum R, G, Y and W are needed since connecting R to G activates the blower, R to Y activates the Compressor, and R to W activates the heat as we have seen. There are lots of variations on how the heat is activated. In addition, if a common C is supplied then 24 VAC is available at the thermostat (across R and C) to power the thermostat. If the thermostat requires power and a C wire is not available, then a battery in the thermostat must be provided to provide the power. Since batteries die at the worst times, and typically the thermostat open-circuits, which turns the system off, when the battery dies, this is a bad procedure. If the home is unoccupied for long periods, such as summer or winter homes, mold or freezing problems can develop, all caused by a dead battery in the thermostat. At a minimum, it is recommended to run at least 6 conductors (C, R, G, Y, W, and B or O) even in an AC installation, since a retrofit to a future heat pump system is still possible. Additional wires prove to be extremely useful when an installed wire fails and it is nearly impossible to run a new set of wires.
Summary
A typical thermostat will have a C terminal which, along with the R wire, provides 24 VAC to the thermostat for clock and other setback purposes. The G terminal is connected to the blower contactor coil, the Y to the compressor contactor coil, and the W terminal is used for heater activation. When W is used for emergency backup heat, it is typically labeled W2. Either the B terminal or O terminals are used for the heat pump reversing valve, while they can be used for any heating or cooling-specific function. A thermostat will make a R-B connection when the System Selector is set to "HEAT" (as shown in Figure 3) and it will make the R-O terminal when the system is set to "COOL" as shown in Figure 2.
Which circuit to use, namely the R-B or R-O, depends on the heat pump reversing valve. If the reversing valve is normally closed in the cooling position, then it has to be powered to switch to heating mode, so the R-B circuit is used and the reversing solenoid is connected to C and B. When the thermostat calls for HEAT and completes the R-B circuit, then 24 VAC is supplied across C-B and the reversing valve is activated into heating mode.
Likewise, if the reversing valve is normally closed in the heating position, it must be powered to switch to cooling mode. In this case, the R-O circuit is used, and the reversing solenoid is connected to C and O. When the thermostat calls for cooling and completes the R-O circuit, 24 VAC is supplied across C-O, activating the reversing valve into cooling mode. The B and O terminals can also be used to energize dampers in heating or cooling modes or control any other device that is heating or cooling mode specific. However, in practice, these circuits are rarely used on thermostats that are not controlling a heat pump.
With the rising popularity of heat pumps, as well as multiple heating sources, thermostats have been designed with greater flexibility when controlling the assorted heating methods. These newer thermostats are different from standard heating & cooling thermostats since, when heating, the thermostat can be configured to make R-W and R-G, compared to a standard thermostat that makes only R-W when heating is being called.
On most thermostats, there is also typically a jumper, or shut that can be cut, when the Rh-W circuit is powered by a heating transformer and the Rc-G is powered by a different transformer. With Rc coming from the cooling system transformer and Rh coming from the heating system transformer. Of course, heat pumps only have one transformer.
If these heat pump thermostats have a R-W circuit, it is typically labeled R-W2 since the first stage of heat is obtained by the reversing valve position and operating the compressor (R-Y) and blower (R-G), and the backup heat is obtained by activating RW2. Typically, there is no W1 terminal on this type of heat pump thermostat. Typically a thermostat for an AC system with electric heat coils in the air handler is configured to make both the R-G circuit at the same time it makes the R-W circuit, instead of relying on an extra set of contacts on the heating relay to activate the blower.
As shown in Figure 1, for a standard heating-cooling thermostat there is no power to the Y circuit when the thermostat is set to either "OFF" or "HEAT." Similarly, if the fan switch is set to "AUTO" there is also no power to the G circuit when the thermostat is set to either "OFF" or "HEAT." There is, however, power to the G circuit if the fan switch is set to "ON," regardless of whether the thermostat is set to "COOL", "OFF" or "ON." See the images below for a visual representation of the various completed G circuits in a basic thermostat.
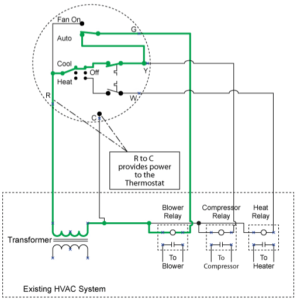
Individual circuit for blower relay coil – Auto
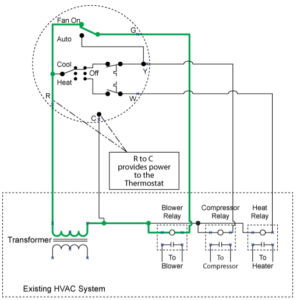
Individual circuit for blower relay coil – On
For a typical thermostat, as shown in Figure 1, when the thermostat is set to "COOL" and the fan set to "AUTO" both the blower (G) circuit and the compressor (Y) circuit are activated simultaneously when the thermostat calls for cooling. When the thermostat is set to "HEAT" (and the fan set to "AUTO"), neither the blower (G) circuit nor the compressor (Y) circuit is activated, regardless of the thermostat setting. Alternatively, for a heat pump thermostat, both the R-Y circuit and the R-G circuit are activated on a call for either cooling or heating as shown in Figures 2 or 3.
This guide is by no means completely exhaustive of all thermostat configurations available to control an HVAC/R system. However, it serves as an in-depth introduction to thermostat wiring and principles that a beginner can grow upon.
For supporting information check out
- AC Tech Service Tech's Video Heat Pump Thermostat Wiring Explained! Colors, Terminals, Functions, Circuit Path!
- Honeywells Article How Do I Wire My Thermostat?
- HVAC Alliance Expert's Blog Decoding Thermostat Wiring Colors
Check out our HVAC certifications and training available on EPATest.com


